The 11th Company 40K Podcast

Welcome to the 11th Company BLOG. The 11th Company is a Warhammer 40K podcast dedicated to players, strategies, and tactics.

You can download our episodes at the website, from ITunes, several podcast sites, or connect directly to the RSS Feed. We try to release a new Episode every Monday Night. Check it out!

Forums: http://the11thcompany.freeforums.org

PODCAST WEBSITE: http://www.tangtwo.com/11thcompany

PODCAST RSS FEED: http://www.tangtwo.com/11thcompany/podcasts/the11thcompany.xml

Podcast Archive: http://the11thcompany.libsyn.com/webpage


Search This Blog

Wednesday, February 12, 2014

DIY Bastion

Wanted to share my experience in making a Bastion from scratch. I am well aware GW makes a Chaos Bastion, but really, they expect me to pay extra money for a few spikes on the Imperial Bastion? I don't think so. 

Even if you are not a Chaos player you can follow the basic principles to build any Bastion for your desired codex.

One of the most abused Model for Advantage crimes is taking creative freedoms with the size & firepoint locations. Best to mimic the original model as close as possible to avoid any grief on Tournament Day. The base is a 6" square that rise about an 1" before tapering into a 4" by 4" column

The Bastion with battlement is just over 6" tall. On the North & South Sides, there are 3 fire points and 1 Heavy bolter, while on the East & West sides there are one Fire Point and one Heavy Bolter. There is one access point on the South side. 


This top view shows clearly that the bastion is really only 4" by 4" at the top

I start with my base. One myth I cleared up quickly is, like the Rhino model, your squad cannot actually fit inside. That meant I did not have to worry about the Bastion actually being hollow to place models inside. So I started with a 6" by 6" by 1" slab to be my base.

I chose to ignore the taper and went with 4" walls. Notice that the East & West walls need to be slightly smaller due to the thickness of the foam. Remember the final product needs to be 4" by 4".

I added a support piece to the corners to keep the walls from collapsing in on itself. The same basic technique you would use when building ruins by supporting the 90' corner

Side view to see how the walls were slightly smaller to compensate for the foam thickness (FYI I used 1/2" foam which actually measures about 3/4")

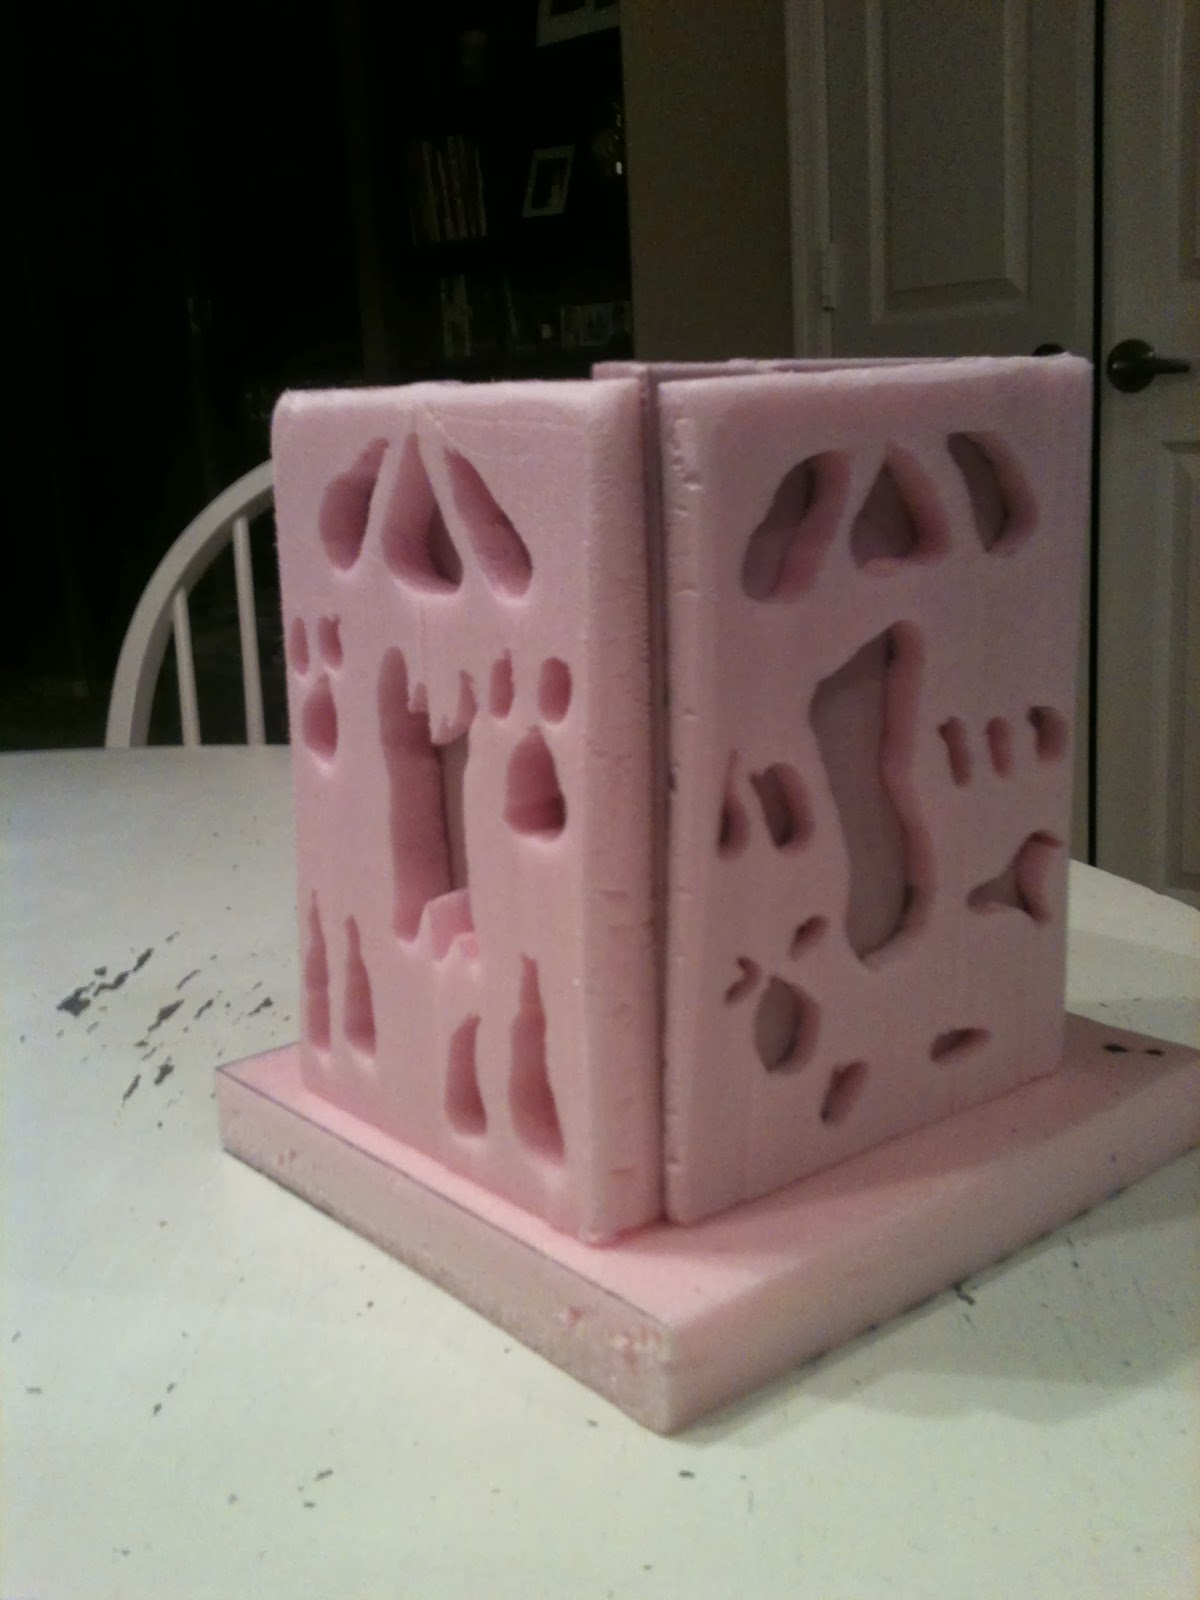
Time to add the Chaos. I traced the walls onto a 1" slab of foam. Originally I used Pumpkin Carving kits, but after a while I got bold & freehanded the design with an ordinary pen. I was trying to mimic the towers on the old Chaos Horde box from Epic.

At this stage you can vary your Bastion to your codex.
Tyranids could do more of a rib cage pattern
Orks can use varying textured plasticard and corrugated cardboard to simulate the hodge podge orkitechure
Tau & Eldar will need a little more work to get those rounded edges. For Eldar, I would start with carving glyph from the codex like the ones for each Craftworld or Aspect Warrior
Dark Eldar use more curved claws coming out of the corners
Necrons I would invert the bottom to simulate the casket shape. So the base would be 4" by 4" that expands out to 6" by 6" about 1" from the ground, then taper again back to 4"
Space Wolves you can mimic a wolf's head instead of this Chaos skull
Experiment!

Using a plunge tool I cut out my pattern

Since I did not want a smooth finish to the outside, but need a smooth inside to attach to the Bastion structure, I used by table saw hot wire tool to cut the sections in half, creating 2 pairs of each
I glue the detail walls to the structure. Not happy with the corners, I shaved them down with a knife and later sanded them to make them more even

Lost some of the in progress photos of this next step. The battlement was another 6" by 6" by 1" slab of foam. I freed handed the Chaos Star to give it a corrupted look using the table saw tool so the vertical edges are straight. I then used a plunge tool to carve out the middle section. In my haste, I made the hole too large. No worries, I used a diamond plate textured plasticard to make the floor, then glued everything to the top of the tower.

The paint job is sloppy but that is what happens when you attempt to make a bastion from scratch 72 hours before a GT. Paint job was base coat black, then dry brush with Downpour (Behr paint) then drybrushed with Grey Area (Behr paint). Shown here at Duelcon 2013
So save your money and try customizing your own Bastion. It is easier than it looks!

4 comments:

  1. I love it. Easy to do and very fast. Definitely something I should keep in mind when I do terrain pieces.

    ReplyDelete
  2. Really nice idea. Nice to see something different and something most folk could achieve given a bit of effort. Some may claim my own Tyranid Bastion is 'modelling for advantage' as it is more an oblong than a square base but that was so I could have it fit in the Citadel Moonscape craters. However the rooftop footprint is less than a standard Bastion so I have lost something where I may have gained in others.

    Officially a Bastion is classed as a Medium Building, which is anything between 6"x6" to 9"x9". So even if someone claimed the structure was too big if it fits within those dimensions you actually haven't broken any rules.

    ReplyDelete
    Replies
    1. Most concerns about modeling for advantage surround the fire points and heavy bolters. One if my Eldar prototypes is much skinnier with a roof above the battlement but the base is still 6 by 6

      Delete

Due to spam, all comments are moderated.

Pat

Note: Only a member of this blog may post a comment.